


Route tracking: field sales and customer visits
Plan daily routes for your field sales reps; track visits, missed visits, distance, sales, orders and collections, notes and photos. Works offline too.
With route tracking you plan which customers your field sales reps visit on which day and in which order. The rep sees the day's list in the mobile app, starts the visit, makes a sale, takes an order or collects a payment, and adds notes and photos; on the web panel you see who visited which customer, what was sold, and which visits were skipped or never made. Route tracking is available for licensed accounts.
The location is taken only once, when the rep taps Start visit. There is no continuous location tracking.
In-page tour
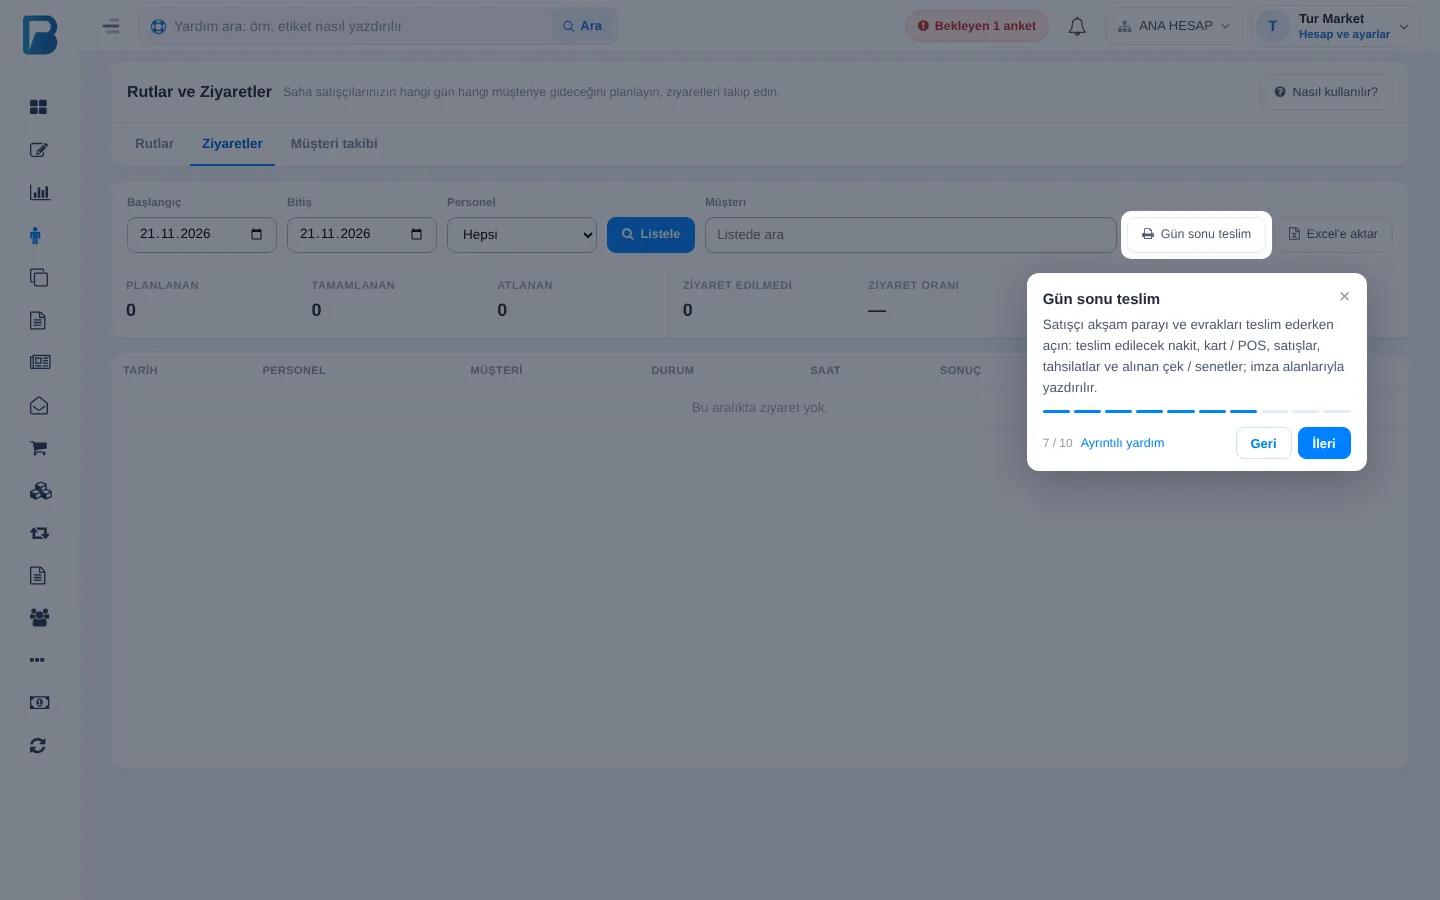
The first time you open the page, a Shall we take a quick tour? card appears at the bottom right. Click Start tour and the parts of the page are 1 highlighted one by one, with 2 a short explanation next to each. 3 Use Next and Back; arrow keys and Esc also work. 4 Detailed help opens this article. You can open the tour again any time with 5 How does it work?.
 12345
Permissions
The account owner sees everything. For staff, use the Route Permissions section on the Staff › staff member › Customers tab: Can view routes and all visits opens the page and the report, Can create and edit routes allows adding and changing routes. Staff with an assigned route can use My Route in the mobile app without these permissions and see only their own visits.
Creating a route
Open the page
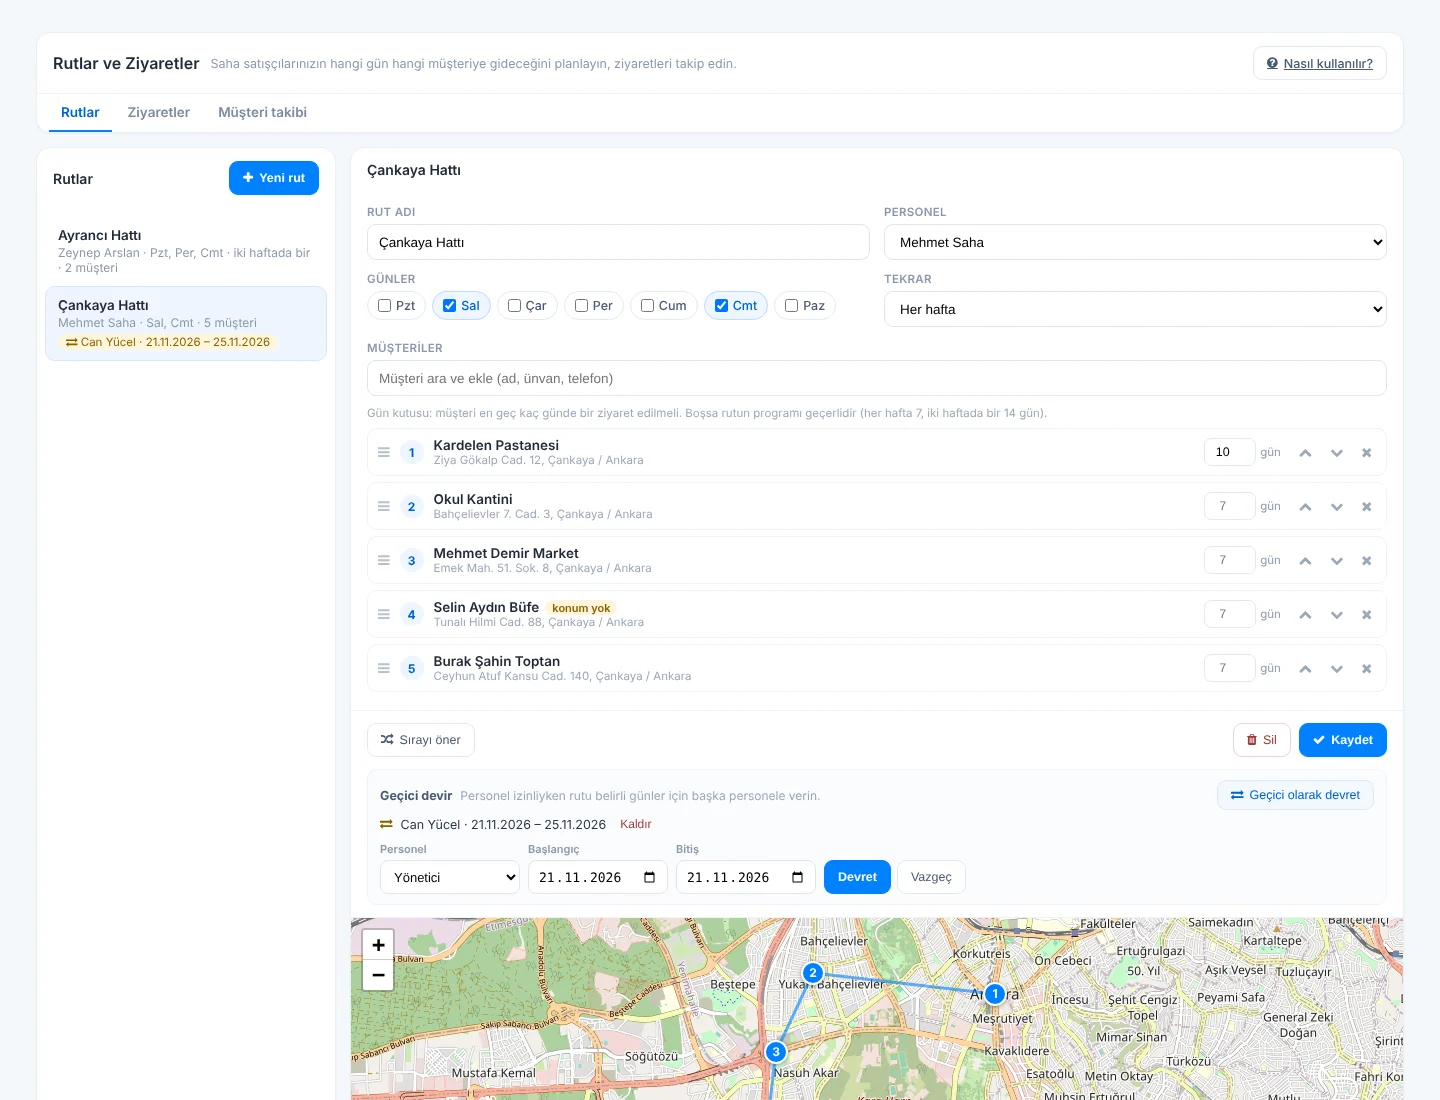
In the left menu open Customers › Routes and Visits and click 1 New route.
Define the route
Enter the Route name and select the Staff member who will drive it. 2 Tick the visit Days. Repeat: Every week or Every two weeks (the week the route is saved counts as the first week).
Add customers
3 Type the customer's name, title or phone in the search box and pick from the list. 4 Change the visit order by dragging or with the arrows. Customers without a saved location show no location; the rep can save it to the card on the first visit. A customer can be on more than one route; on the same day it appears only once for the same rep. 7 The days box next to a customer sets how often, at the latest, that customer should be visited; if left empty, the route schedule applies (every week 7, every two weeks 14 days).
Suggest an order and save
5 Suggest order sorts the customers with a saved location by the shortest route; the first customer in the list is the starting point. The order is drawn on the map. 6 Click Save.
 123456789
When you change a route, today's visits that have not started yet are rebuilt from the new list; visits that were started, completed or skipped stay as they are. Changes do not affect past days. Past visits of a deleted route remain in the report.
Temporary handover
If a rep is on leave, give the route to someone else without deleting it: open the route, click 8 Hand over temporarily, choose the staff member and date range and click Hand over. On those days the visits appear in that person's My Route; when the dates end the route returns to its own staff member automatically. 9 A handed-over route is marked in the list. If the rep is back early, click Remove; the route returns from today. Past days are not changed.
Tracking visits
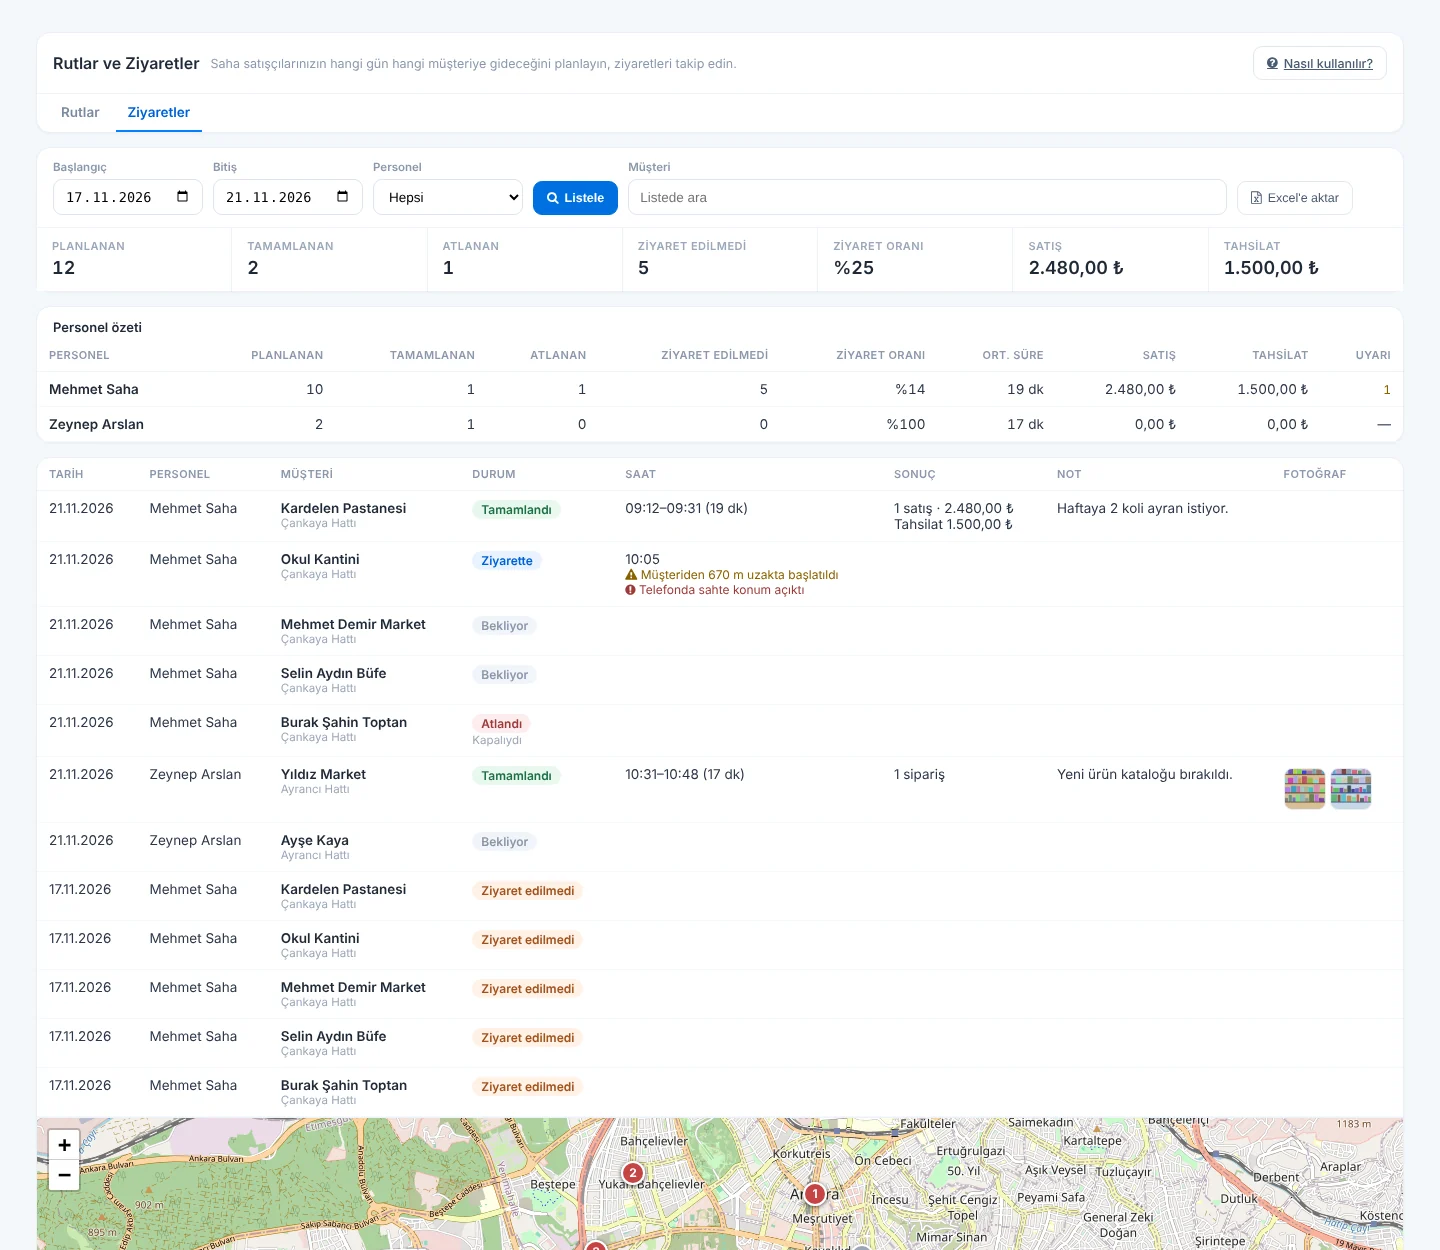
On the Visits tab 1 select the date range and staff member and click List; use the Customer box to search the list. 2 At the top you see planned, completed, skipped and missed visits, the visit rate and the total of sales and collections made during visits. When several staff members are listed, 3 the Staff summary shows each rep's visit rate, average visit duration, sales, collections and warnings side by side. 6 Export to Excel downloads the list with all details.
 123456
- The plan is created automatically every day; that day's visits are listed even if the rep never opens the app. A visit not made on a past day shows as 5 Not visited, one that was started but not finished as Not finished.
- Visit rate: completed planned visits divided by planned visits that have a result; today's visits whose turn has not come yet are not counted.
- If the rep started the visit more than 300 metres from the customer's saved location, Started … away from the customer appears; if a location-changing app was on, 4 A fake location app was on appears. The visit is not blocked; this is recorded.
- Sales, orders and collections are found automatically from the transactions made for that customer between the start and end of the visit; sales made offline and synced later are also picked up.
- On the map completed visits are green, skipped and missed ones red, waiting ones grey. Visits outside the route are listed as Unplanned visit.
End-of-day handover report
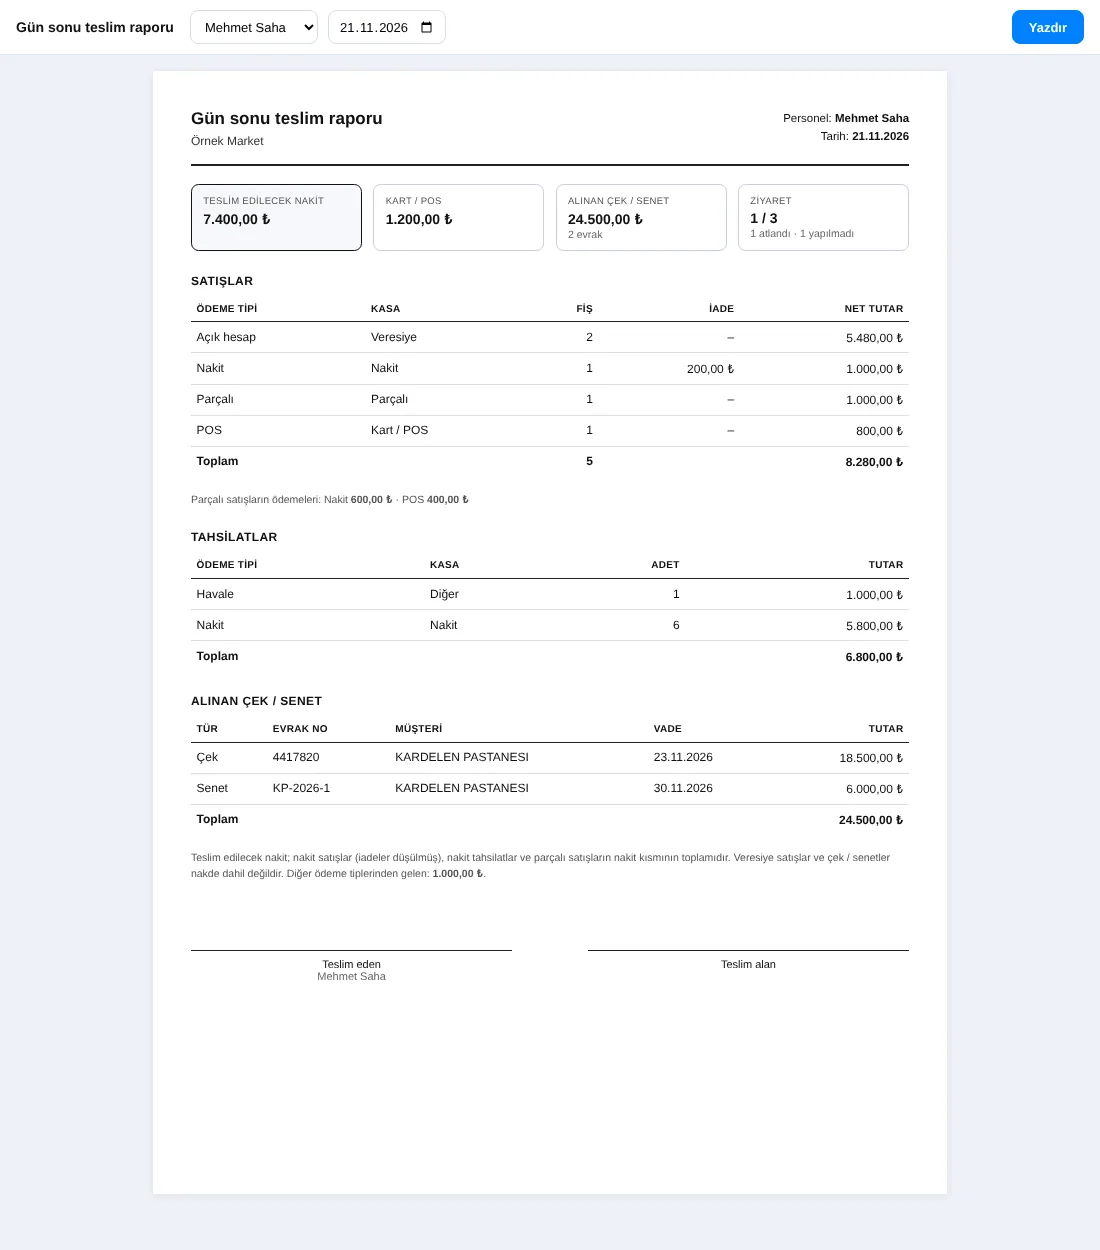
When a rep hands over cash and documents at the end of the day, click End-of-day handover on the Visits tab: the selected staff member's day on the End date opens in a new tab (when you list a single day, the printer icon in the Staff summary also opens that person's report). 1 You can change the staff member and 2 the day here as well, and 3 print it with Print.
4 Cash to hand over is the total of cash sales (net of returns), cash collections and the cash part of split sales. Next to it are the card / POS total, cheques / notes received and the number of visits. 5 Sales are listed by payment type, followed by collections and the cheques / notes received that day. 6 Signatures of the person handing over and the person receiving.
 123456
The report shows all sales and collections the staff member made with their own user, including those outside the route. Sales on account and cheques / notes are not added to cash.
Customer follow-up
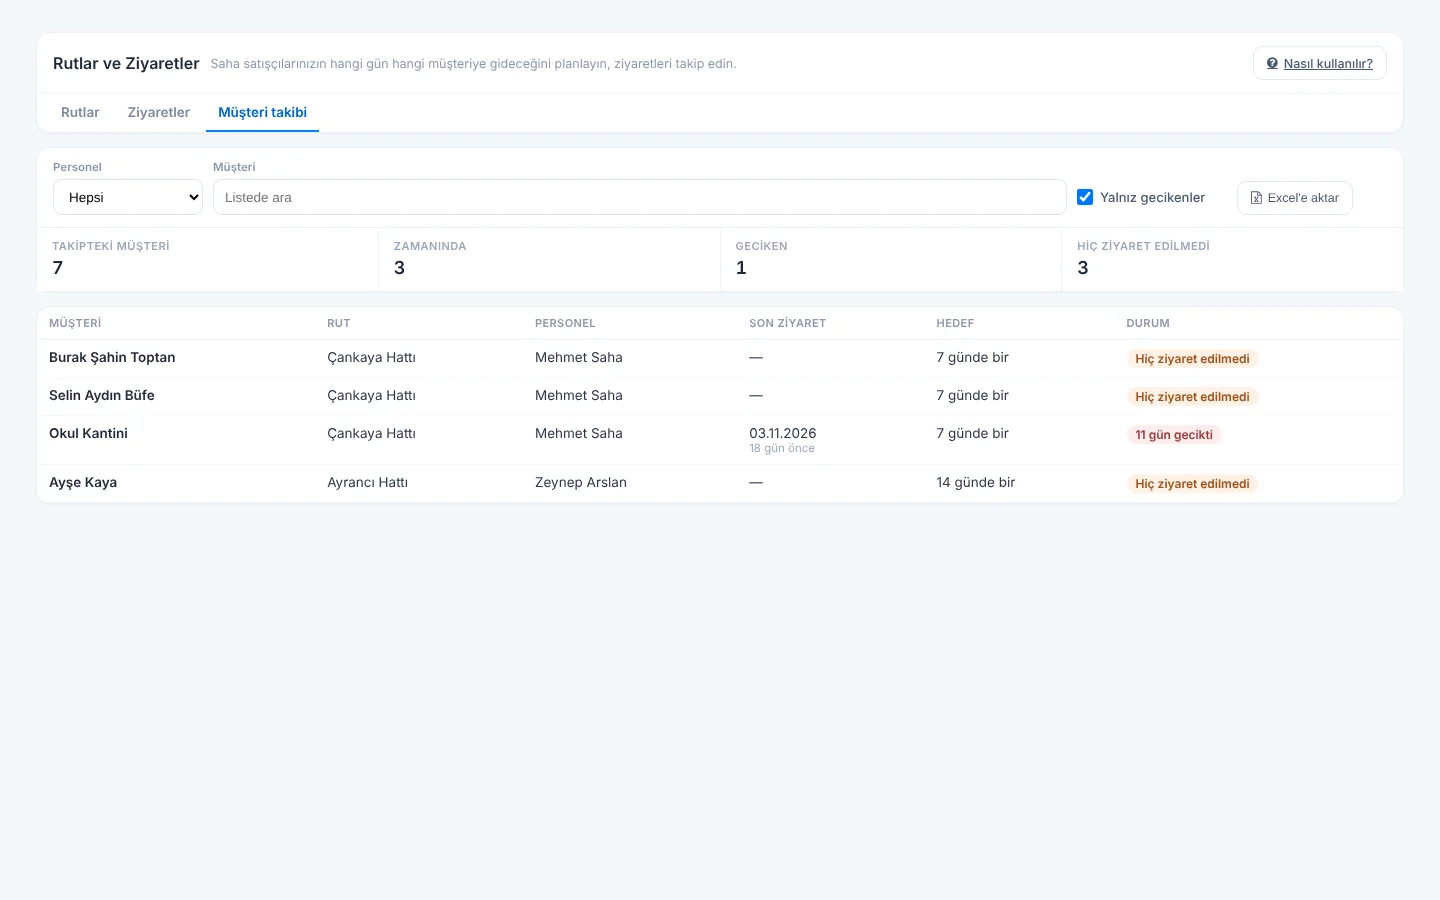
The Customer follow-up tab shows the last visit and target of every customer on your routes. 1 Choose a staff member and search; with Overdue only ticked only customers past their target are listed. 2 At the top you see customers followed, on time, overdue and never visited. 3 For customers past their target the delay in days is shown, 4 and Never visited for those not visited since the route was set up. Download the list with Export to Excel.
 1234
Route tracking is not available in the desktop app. Create routes on the web panel; reps make the visits in the mobile app.
My Route
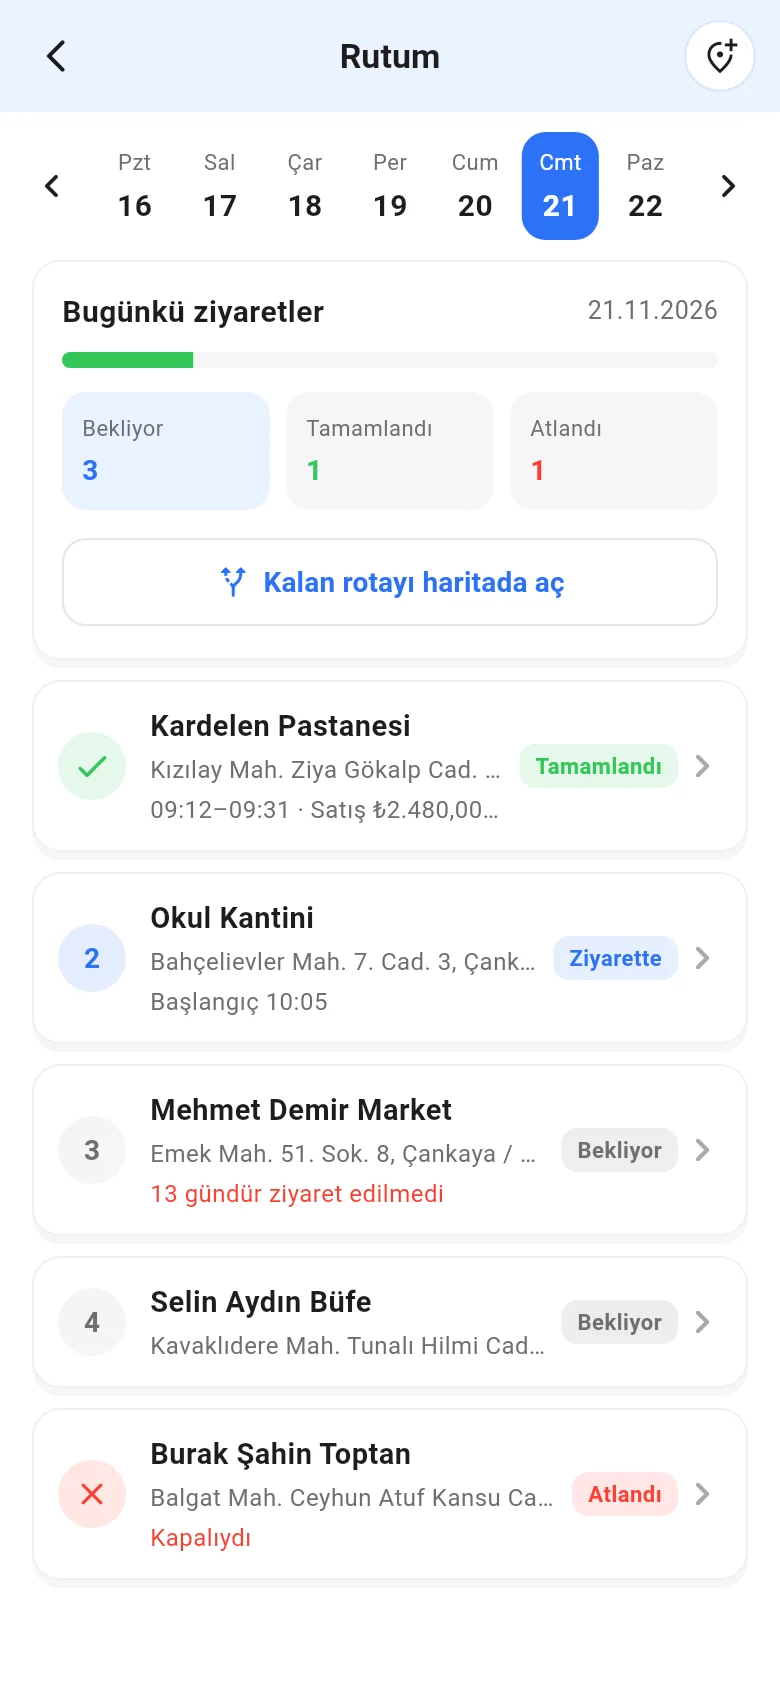
Staff with a route see a Today's route card on the home screen and Menu › My Route. 1 Pick a day on the week strip: past days show that day's record, future days show the planned customers; visits can be started only on their own day. 2 If you visited a customer that is not on your route, add an Unplanned visit at the top right. 3 Open remaining route in Maps opens directions in Google Maps through the customers not visited yet, in order. 4 Customers are listed in route order. A customer past their target shows Not visited for … days in red.
 1234
Starting or skipping a visit
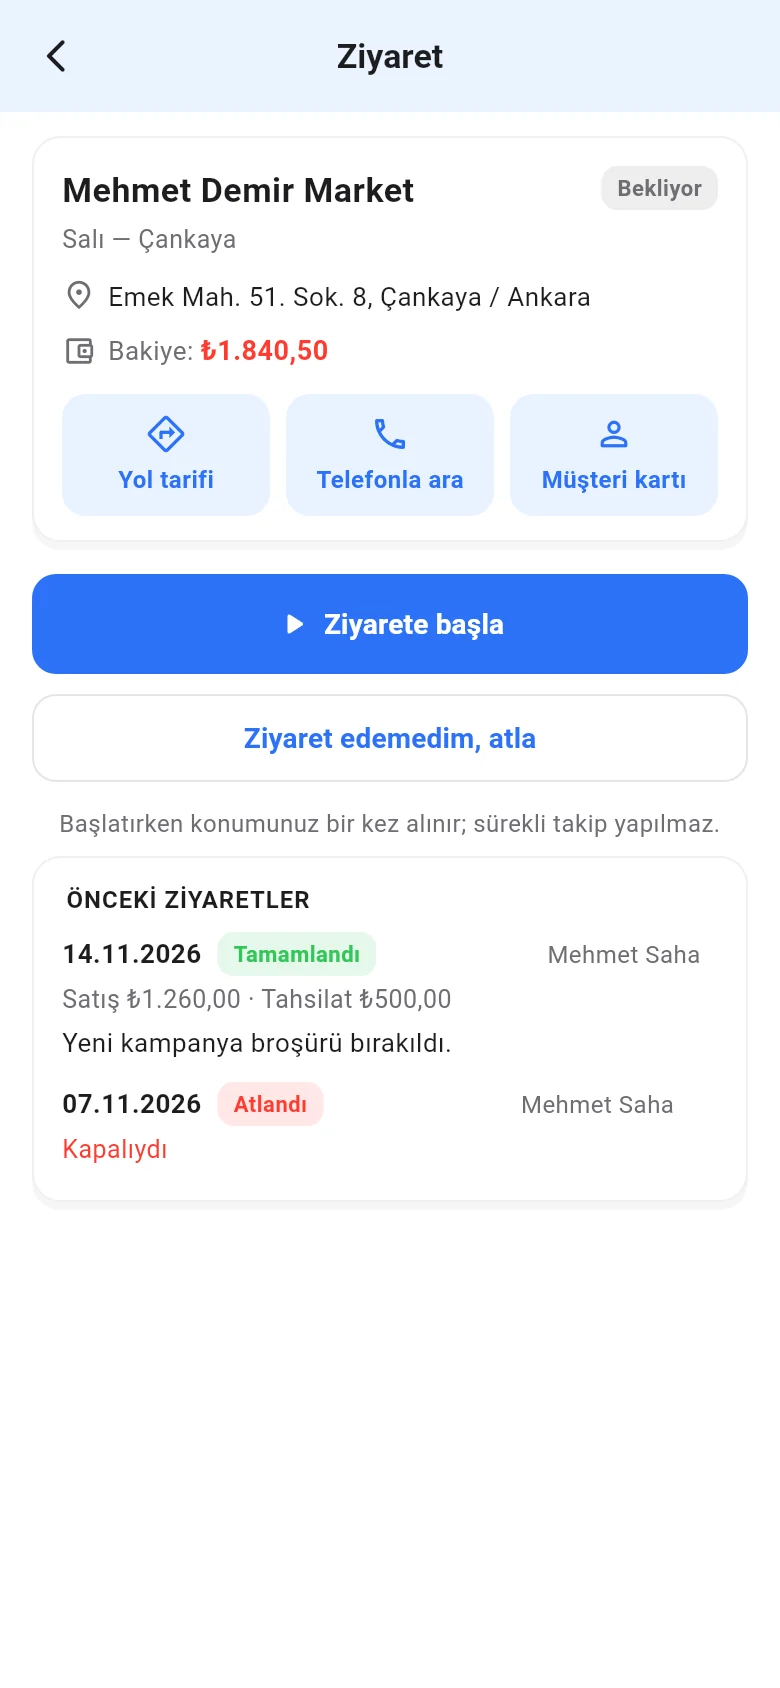
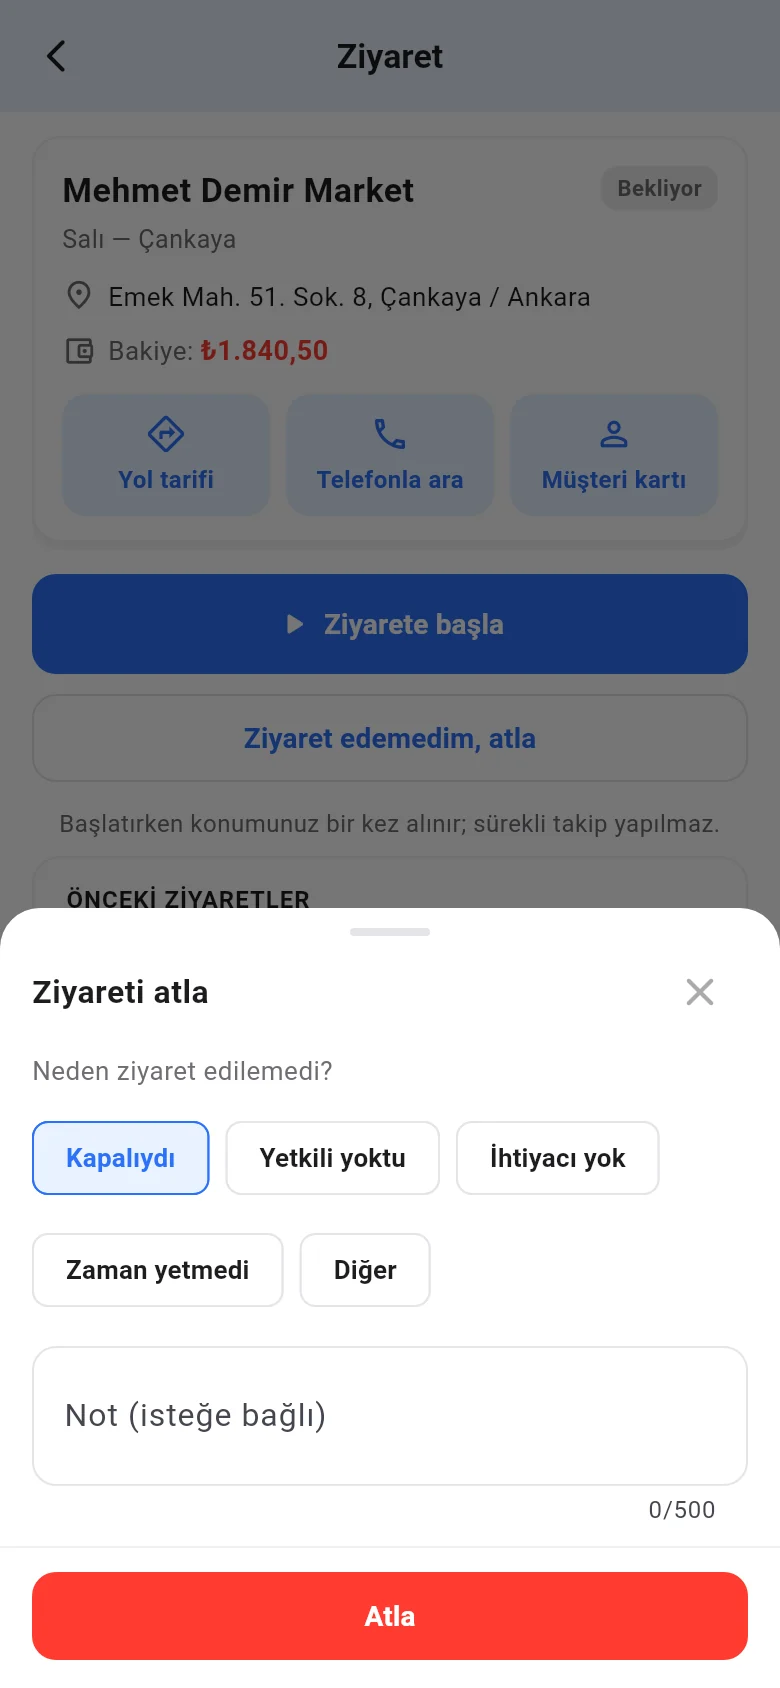
Tap the customer. The card shows the address, the customer's current balance and the 1 Directions, Call and Customer card buttons; below, the date, result and note of previous visits are shown. 2 When you arrive, tap Start visit: your location is taken once. If the customer has no saved location, the app offers to save your location to the card. If you are more than 300 metres away, a warning appears and the visit still starts.
If you could not go, tap 3 Couldn't visit, skip, 1 choose the reason and tap 2 Skip. If you skipped by mistake, open the visit and tap Undo.
 123
 12
During the visit
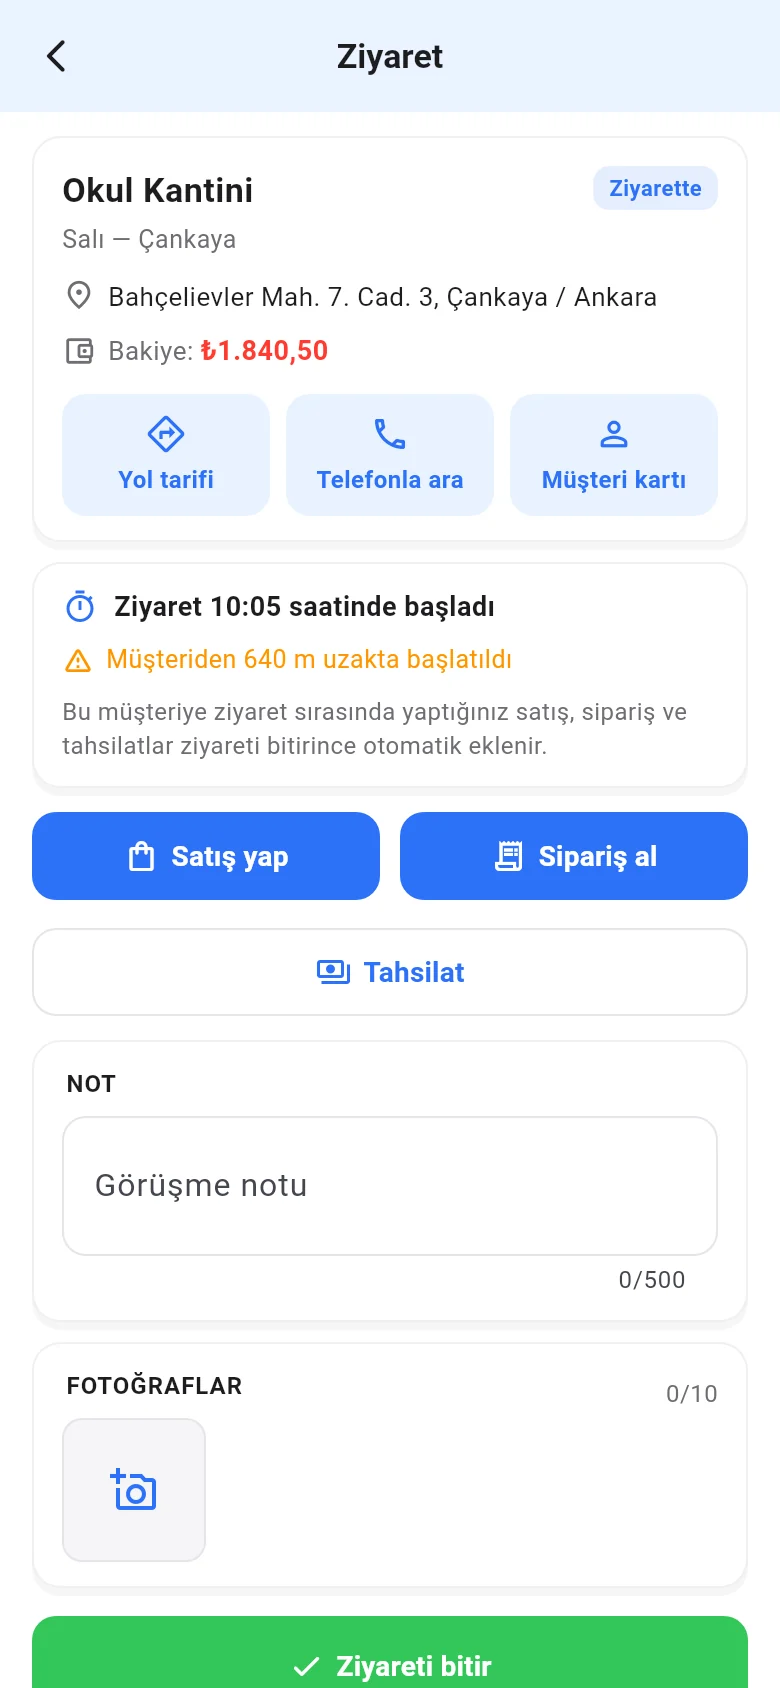
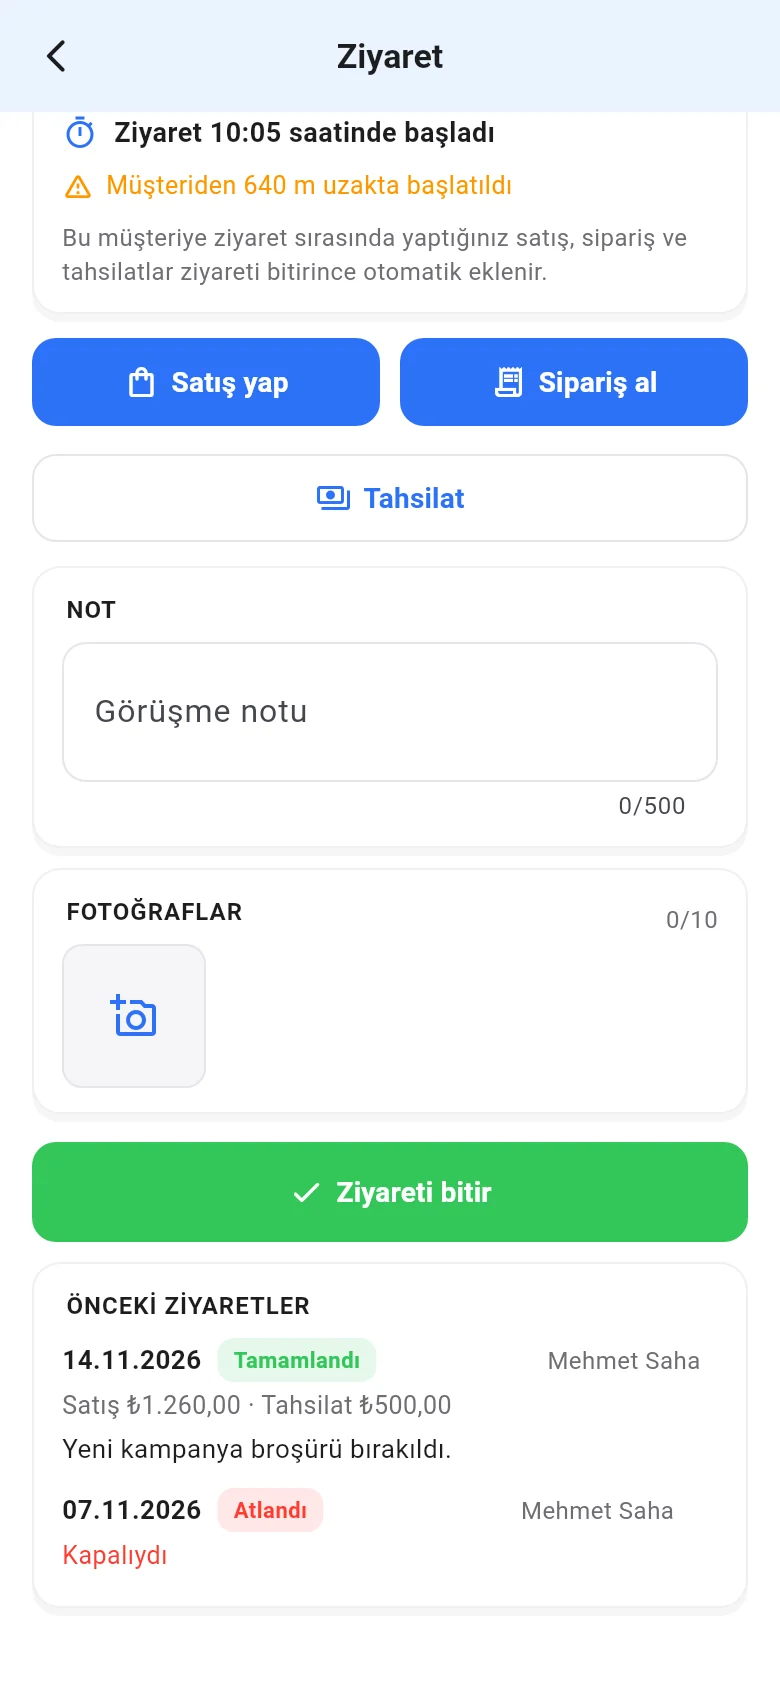
1 The customer's balance and 2 the visit start time and distance to the customer are shown. 3 New sale opens the sales screen with the customer selected. 4 Take order opens the same screen for an order; add the products and tap Save order (shown when the order module is on and you may create orders). 5 Payments received opens the customer card. Write a visit note and take a photo or add one from the gallery (up to 10). 1 When you are done, tap Finish visit. 2 Previous visits show what was discussed on the last visits.
 12345
 12
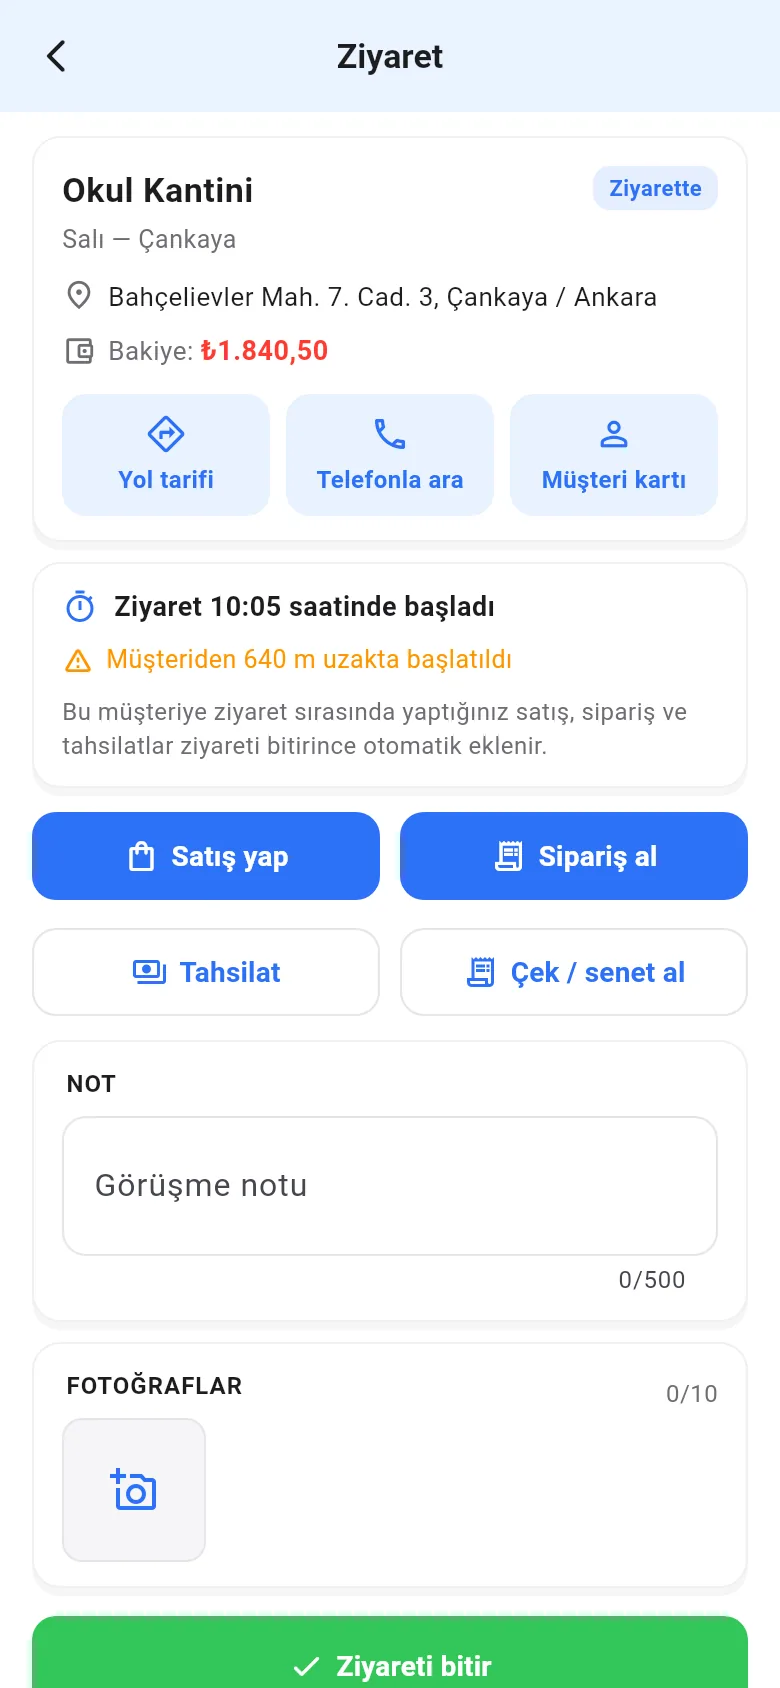
In accounts that use cheque / note tracking, the visit also shows 1 Receive cheque / note (requires permission to add cheques / notes): document entry opens with the customer selected. The document is posted to the customer account according to the cheque / note setting and appears in the end-of-day report.
 1
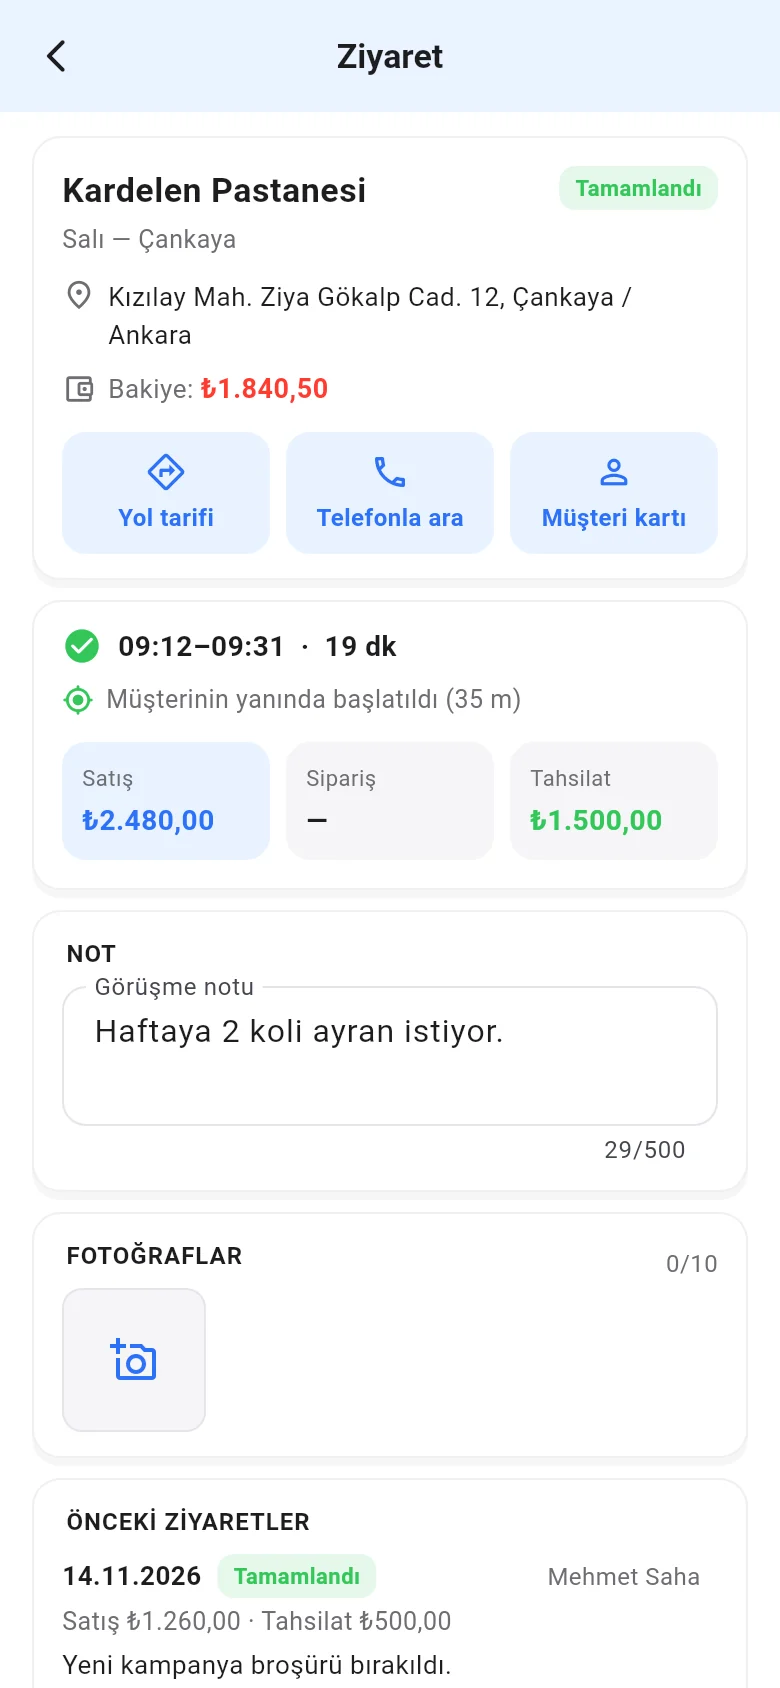
A completed visit shows 1 the start and end time, duration and location info, and 2 the sales, orders and collections made during the visit.
 12
End of day
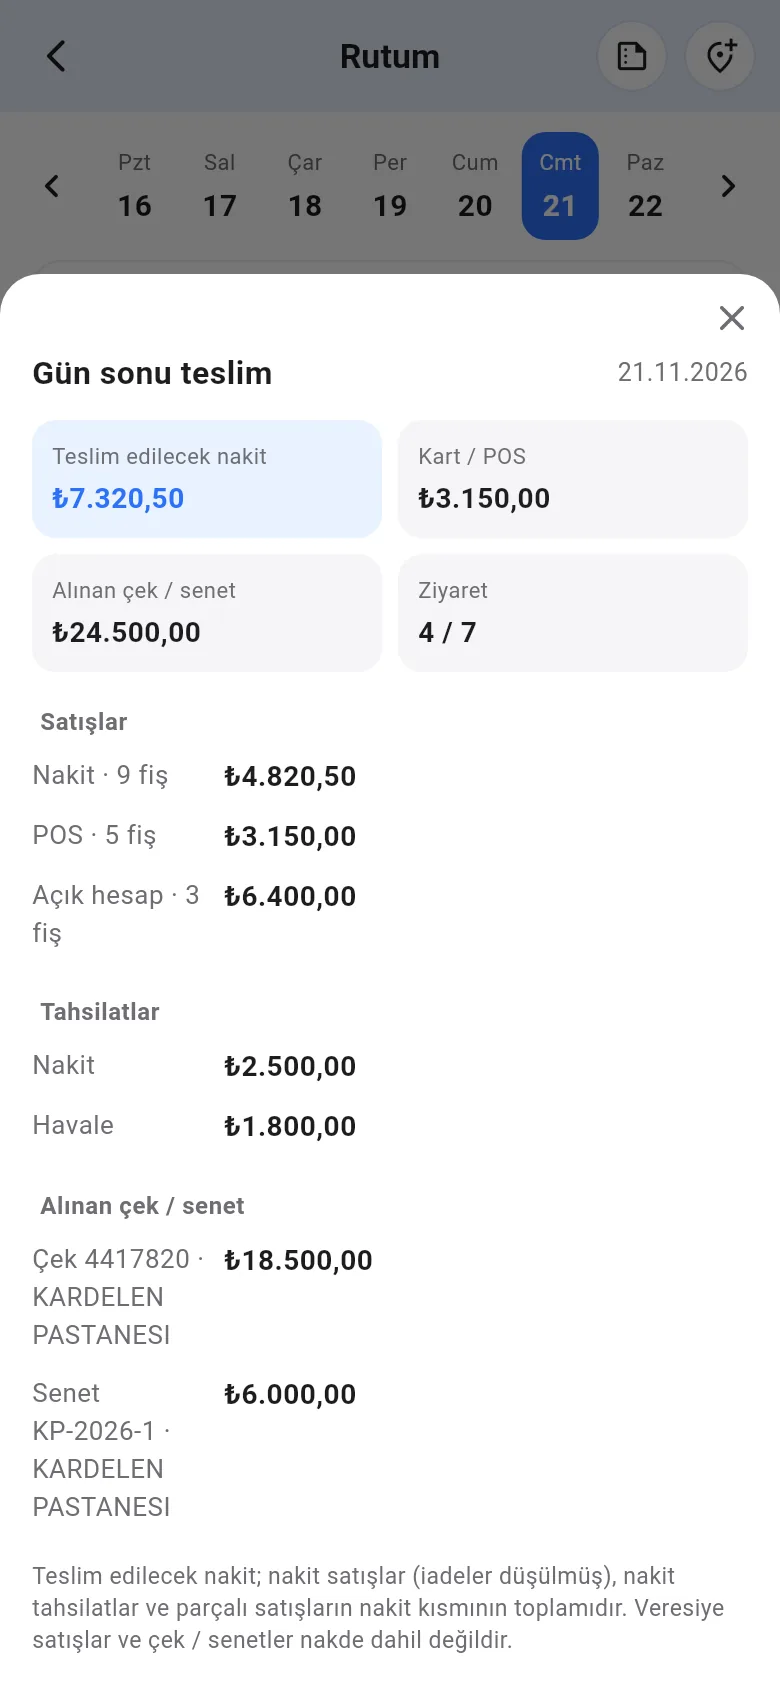
In My Route, tap the 1 icon at the top right to open the summary of the selected day: 2 cash to hand over, card / POS, cheques / notes received and number of visits, 3 sales and collections by payment type, 4 cheques / notes received. To see a past day, first select it on the week strip.
 1234
When there is no internet
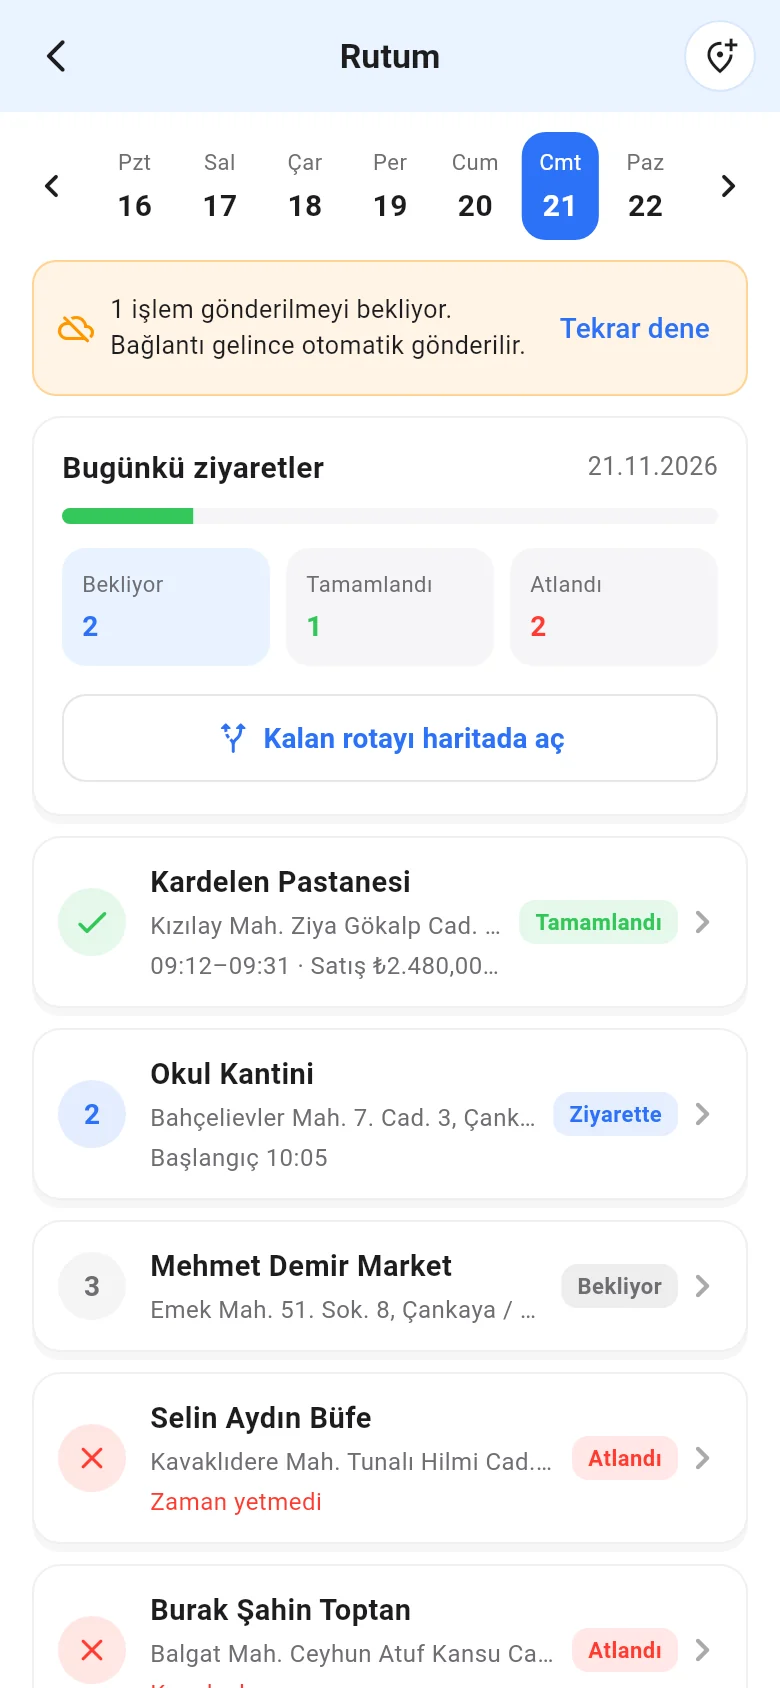
You can keep working where there is no signal: Start visit, Finish visit, skipping, undo, notes and photos are kept on the phone and sent in order, with the phone's time, when the connection returns. 1 When actions are waiting, a strip appears above the list; tap Try again to send them right away. Without internet the last downloaded list is shown. Adding an unplanned visit needs internet.
 1
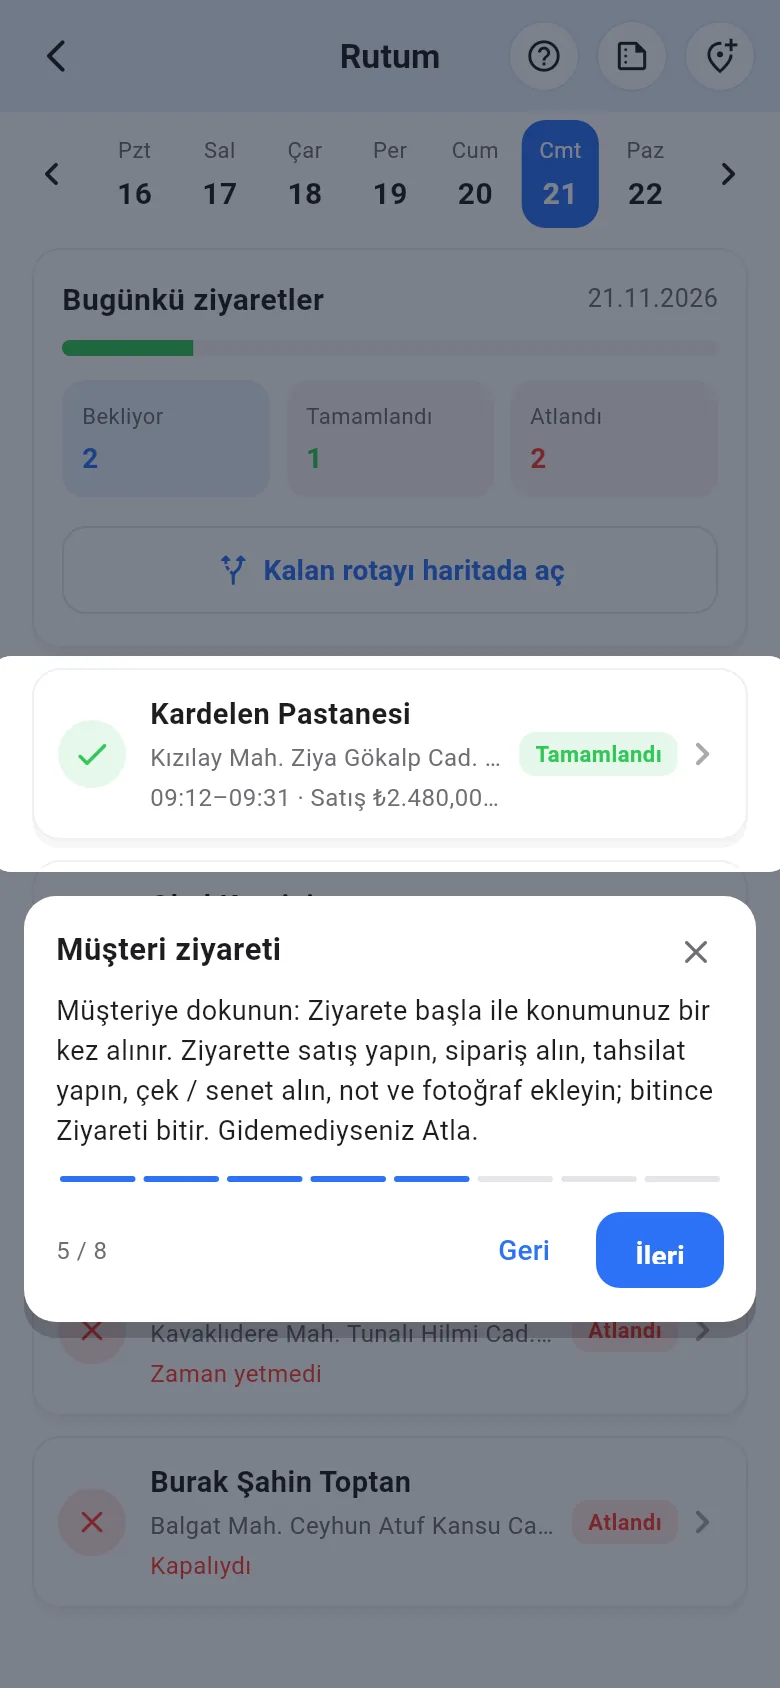
On mobile, the same tour is offered the first time you open the screen: 1 an area is highlighted and 2 its explanation appears below it. Open the tour again any time with the 3 ? icon at the top right.
 123
- If a location-changing app is on, the visit still starts; this is recorded on the visit and visible to the manager.
- Reps see only the routes and visits assigned to them.
- Routes are created and edited on the web panel.